PLC Machine Vision Using CODESYS, Python, OpenCV and OPC UA 2022
In this tutorial, we will go through all the steps to create a PLC Machine Vision based project.
We will use tools like OpenCV, Pyhon, OPCUA and many more. So let's get started.
What is Machine Vision in Industrial Automation
Usually, a PLC makes its decesion based on the sensors around it.
With PLC Image Processing, the decesions will be taken based on images the camera is feeding to the Machine Vision engine, and commanding the PLC to act accordingally./
Project Overview
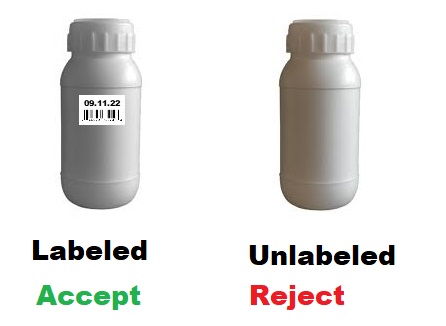
The system is an Automatic Bottle Labeling Inspector. Which would check the bottles on the conveyor band, if they are up to the standard or not.
If the systems notices that a bottle does not have a label on it, it will automatically command the PLC to actuate an ejection piston.
Bottle labeling is vital in chemical proccess factories, this is why such a Quality control check is very important for a large line.
Now let us look at an overview of this system.
What does the Machine Vision System consist of ?
First take a look at this diagram:
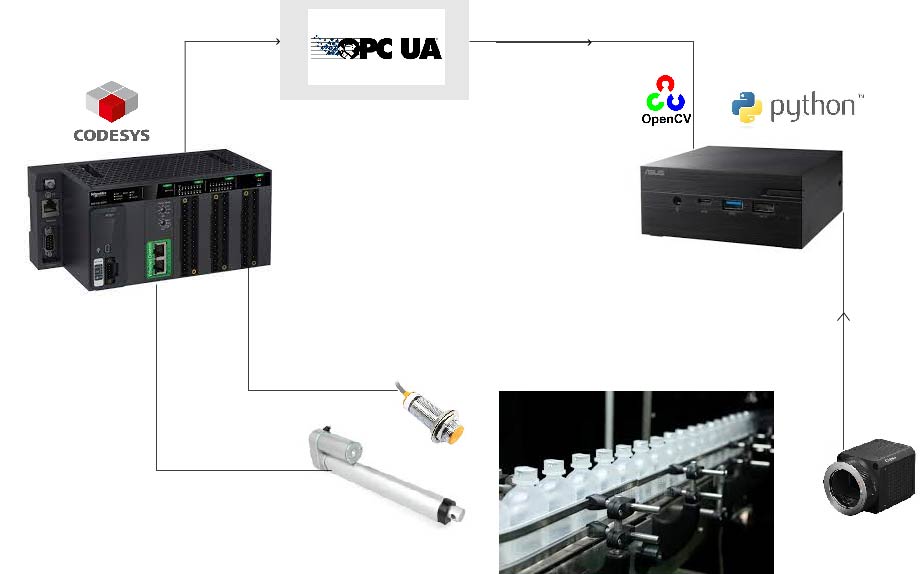
The system consist of the following Electrical and Mechanical aspects:
- Conveyor band carrying chemical bottles.
- A camera monitoring each bottle individually at a specific position.
- A Proximity sensor that detects when the bottle is in the camera vision.
- An Ejection Piston or linear actuator which will eject the unlabeled bottle.
- A mini-PC that runs the Machine Vision Engine.
- A PLC That sends and receives commands from the Machine Vision engine and actuate all the other equipments.
The system consist of the following Software aspects:
- Python script running OpenCV based Image processing engine.
- OPC UA communication running on the mini-PC end and running on the PLC.
- CODESYS Runtime running on the PC if no PLC is available.
What's the beauty of this project?
You DO NOT need to buy any extra hardware or software, we will emulate everything like you already have all that hardware!
What do you need to get started?
- A PC running windows.
- CODESYS Software, This will be your emulated PLC. You can donwload it from the official website. straight forward.
- Anaconda opensource python distribution. Just google Anaconda and install it.
- Spyder IDE. After you downloaded Anaconda, this IDE comes along with it.
- UA Expert Software. You can easily google it and install it. We will use this only to check if our OPC UA communication between the PLC Emulator, and our python script is functional and to get some addresses foramtting.
- I am not going to be using any camera. I'll just emulate that my Camera is taking images and storing it in some directory.
Installing OPCUA
OPCUA communication library does not come pre-installed. To install it:
Open Anaconda Command Prompt and type:
pip install opcua
Installing OpenCV
In Anaconda Command Prompt
conda install -c conda-forge opencv
ONLY IF If OpenCV installaion did not work for any reason, try this:
conda install --channel https://conda.anaconda.org/menpo opencv3
We will start with writting the Python control engine
What does our python engine consist of?
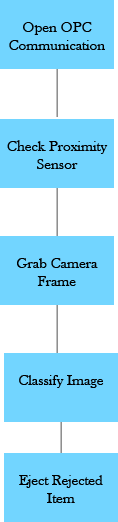
As you can see those are our initial steps to write the python engine, where we need to :
- a Function to open OPC UA communication with our emulated PLC.
- a Function to read the proximity sensor data from the PLC.
- A function to grab the camera frame. or in our case just read an image from a directory (You can replace this function if you have a real camera).
- The core of our Machine vision engine which is the image classifier funciton.
- The eject function, which will send commands to our PLC, to Eject the bottle.
Open Spyder IDE with Anaconda
Open Anaconda Prompt and run
spyder
This should open the Spyder IDE.
Let's sketch out our function quickly
  import cv2
  from OPCUA import client

  def connectOPC():
    pass

  def checkSensor():
    pass

  def activateEject():
    pass

  def grabFrame():
    pass

  def classifyCameraImage()
    pass

  if __name__ == '__main__':

    #The first step is to connect to OPCUA on the PLC Emulator side
    connectOPC()

    while(1):
      pass
This is how roughly our code will look like.
Now we will write and test every function individually and then fill it there. This code above is our general code outlook.
Where to start
I am not going to write those functions in order. Because first I want to focus on the Machine vision engine.
What does the Machine Vision engine consist of?
It will consist of the following:
- Bottle image Binary Thresholding. We have talked about this in a previos tutorial
- Bottle Outer Contour Detection. You can also check that tutorial.
- Label Contour detection. If this step returns nothing, it means we have no label.
1.Binary Thresholding:
We will use adaptiveThresholod() to seperate the object from the background by increasing the contrast.
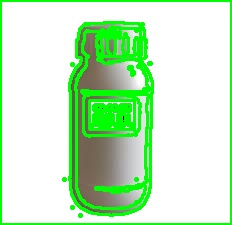
We will use this image as it is being read from the camera:
Those are the first lines of code for classifyCameraImage() :
  #Image path. If you are on window,
  #and the image is in folder use, foldername//bottle.jpg
  frameNumber='bottle.jpg'

  def classifyCameraImage():

    #Read and store the image in a variable as grayscale
    image = cv2.imread(frameNumber, cv2.IMREAD_GRAYSCALE)

    #Store the converted grayscale image (optional) just to see the result
    cv2.imwrite('contourgrey.jpg', image)

    #apply Adaptive Threhold on the grayscale image.
    #15 and 5 parameter needs to be readjusted for every differenct application.
    image = cv2.adaptiveThreshold(image,255,cv2.ADAPTIVE_THRESH_MEAN_C,
            cv2.THRESH_BINARY,15,5)

  #give it a shot and test run it
  classifyCameraImage()
- We are reading the image and converting it to grayscale. Because adaptiveThreshold() is configured for THRESH_BINARY in our case.
- Applying adaptiveThreshold parameters (15 and 5) will be different depending on the lighting conditions, and object. So this needs to be adjusted for every applicaiton. In those application it is recommended that the inspection area is covered with a lighting box for lighting consistency.
- Finally, test run the application. Make sure that your bottle.jpg is in the same directory as your script. otherwise you will have issues.
Result:

As we can see, we have seperated the object from the background. and now this is ready for contouring!
2.Finding contours using Contour Detection
Now let's mark the contours, and store their pixel positions. This is the core of our Macine Vision engine.
    #Image path. If you are on window,
    #and the image is in folder use, foldername//bottle.jpg
    frameNumber='bottle.jpg'

    def classifyCameraImage():

      #Read and store the image in a variable as grayscale
      image = cv2.imread(frameNumber, cv2.IMREAD_GRAYSCALE)

      #Store the converted grayscale image (optional) just to see the result
      cv2.imwrite('contourgrey.jpg', image)

      #apply Adaptive Threhold on the grayscale image.
      #15 and 5 parameter needs to be readjusted for every differenct application.
      image = cv2.adaptiveThreshold(image,255,cv2.ADAPTIVE_THRESH_MEAN_C,
              cv2.THRESH_BINARY,15,5)

    #find contours of the thresholded image.
    contours, heir= cv2.findContours(image=image, mode=cv2.RETR_CCOMP , method=cv2.CHAIN_APPROX_NONE)

    #give it a shot and test run it
    classifyCameraImage()
Result:
Welllll..... This is not the best result. Those contours needs to be cleaned up.
We are picking up light reflections, and a lot of noise.
3.Cleaning up the contours to leave only the label (If it exists)
Now, we want to check if the label is actually on the bottle or not. our goal is to extract the label rectangle in case it exists.
We will add a new function to our function list which is called checkLabel() .
Let's take a look and then explain it:
  def checkLabel(contours):

    for cnt in contours:

          ep= 0.1*cv2.arcLength(cnt, True)
          ap= cv2.approxPolyDP(cnt, ep, True)
          area=cv2.contourArea(cnt)
          print(area)

          if (len(ap)==4 and area>50 and area<16000):
              cv2.drawContours(image=original, contours=cnt,contourIdx=-1,
                              color=(0,255,0), thickness=2,  lineType=cv2.LINE_AA)
              print("No Issue Label Detected")
              return 1
What's going on in this code?
- First we are passing all the countours we found in classifyCameraImage to our funciton.
- Next we will loop through evey one of those many many contours we have found.
- Then two function are being used hand in hand arcLength() and approxPloyDP()
- Those two functions will approximate the contour shape by removing noise and smoothing as much as possible for every contour we are looping through.
- First the perimeter of every contour is calculated with arcLength() and passing True to indicate that we have an closed contour.
- Then we pass that length to approxPloyDP() which is our approximation function.
- By checking the count of coordinates that our approxPloyDP() has returned, we could tell if this is a square label or not.
- For example, in our case this should be 4. Since a rectangle consists of 4 points.
- Next we calculate the area. This is important to clean up the small noisy contours, and the large frame contour around the image.
- For area, this would be a trial and error. Try checking the print output, to indicate the sizes you get. you can easily see that a contour small than 50 is noise. And a contour larger than 16000 could be only the frame contour. This is why we have that area condition.
- The len(ap)==4 is actually the number of point our approximation has returned. We are only interested to see if there is any rectagle contour. which will be our bottle label if it exists.
- finally if the condition is actually satisifed, point count and area wise, then we don't need to loop further. we will just break out of the function and say we found a label!
Test this out!:
  #Image path. If you are on window,
  #and the image is in folder use, foldername//bottle.jpg
  frameNumber='bottle.jpg'

  def checkLabel(contours):

    for cnt in contours:

          ep= 0.1*cv2.arcLength(cnt, True)
          ap= cv2.approxPolyDP(cnt, ep, True)
          area=cv2.contourArea(cnt)
          print(area)

          if (len(ap)==4 and area>50 and area<16000):
              cv2.drawContours(image=original, contours=cnt,contourIdx=-1,
                              color=(0,255,0), thickness=2,  lineType=cv2.LINE_AA)
              print("No Issue Label Detected")
              return 1


  def classifyCameraImage():

    #Read and store the image in a variable as grayscale
    image = cv2.imread(frameNumber, cv2.IMREAD_GRAYSCALE)

    #Store the converted grayscale image (optional) just to see the result
    cv2.imwrite('contourgrey.jpg', image)

    #apply Adaptive Threhold on the grayscale image.
    #15 and 5 parameter needs to be readjusted for every differenct application.
    image = cv2.adaptiveThreshold(image,255,cv2.ADAPTIVE_THRESH_MEAN_C,
            cv2.THRESH_BINARY,15,5)

  #find contours of the thresholded image.
  contours, heir= cv2.findContours(image=image, mode=cv2.RETR_CCOMP , method=cv2.CHAIN_APPROX_NONE)

  #if checklabel did not find anything. it means we have a faulty bottle
  if (checkLabel(contours)!=1):
      print("No label found Activate PLC Reject")
      return 1

  #give it a shot and test run it
  classifyCameraImage()
By that we have created a vert small image processing engine!
OPC UA Python Communication function
Our emulated PLC is going to be running a OPCUA Server, we will see later how to set it up.
This server, will provide our python code with all the PLC Variabels we need to READ/WRITE.
Our python script will act as an OPCUA client.
  def connectOPC():
  global objects

  client = Client("opc.tcp://XXXX-XXXXX:4840")
  client.connect()
  print("Connected")

  objects = client.get_root_node()
- Client communication is being established by specifying the OPCUA server address and port. I'll show you later where to get the server name from. However the port should be 4840.
- Next we call the method connect to establish the connection with our OPC UA server.
- Finally, we get the root node. Now i'm not gonna dive into the technicals. Just think about it as reading all the variables on our OPC UA server and storing them in this objects variable.
- objects needs to be global, because it is defined outside the function initially so that other functions can also access it.
I'm gonna pause here for the Python end and return to continue it later. And i'll jump to the PLC side for a bit.
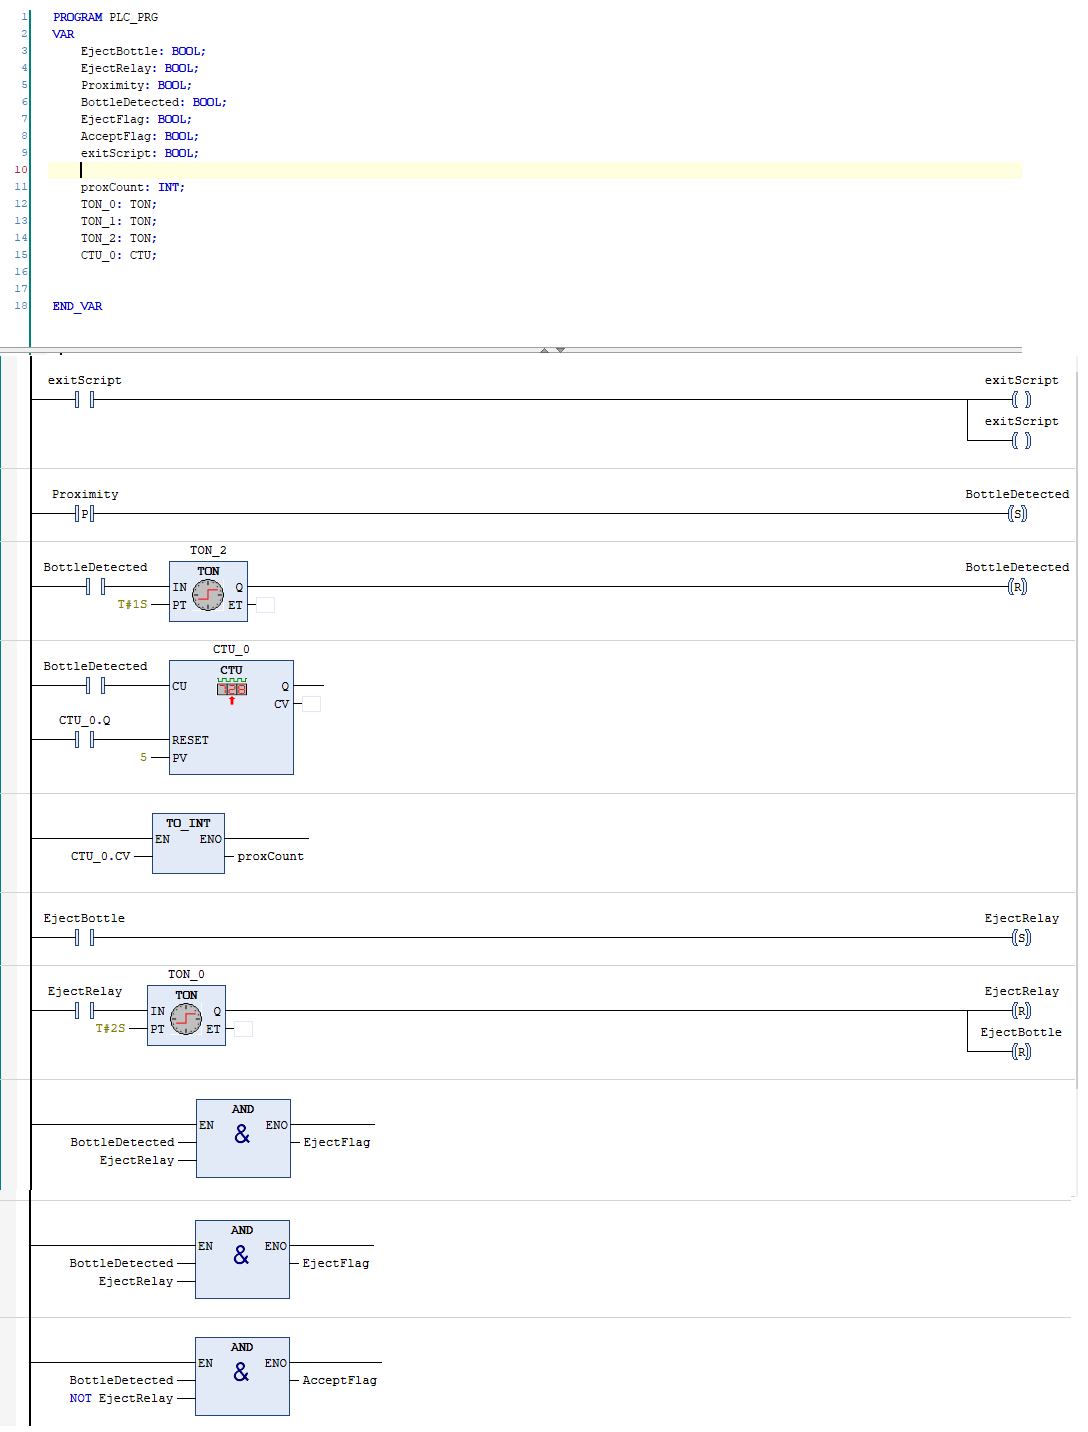
Writting the Bottle Labeling check PLC code
I'm sure that you all know at least a bit of ladder logic. which should be enough.
What will our PLC Ladder Code do?
- Read the status of the proximity sensor
- Actuate the linear actuator or poston to teject the rejected bottles
- Have the ability to exit our script (because why not)
- Maintain the session between our PLC and our Python Macine vision engine. More into that later.
- a couple of animation logical conditions for our HMI
Well this is pretty much all the control code we need.
Setting CODESYS OPC UA
It is not all about code. We also need to prepare our OPCUA on the PLC end.
Follow those steps:
Add CODESYS OPC UA Server
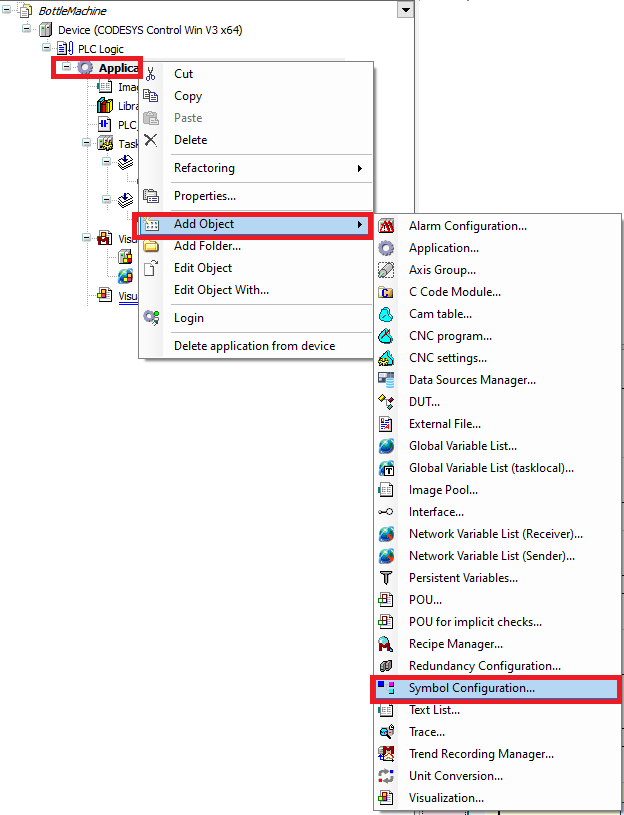
Leave evrything as it is and click Add
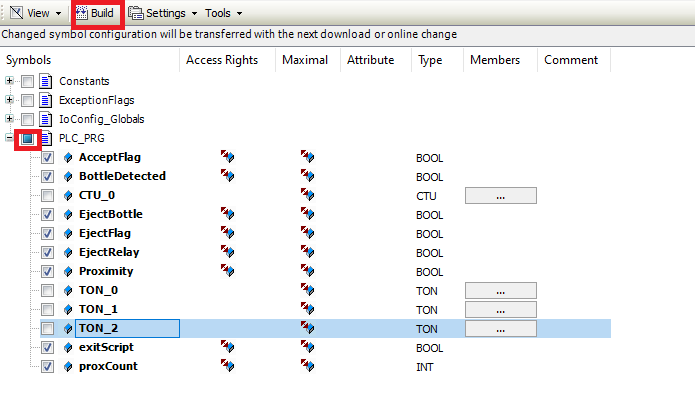
Click on Build, and then choose your variables. Take out the Counters and Timers. They will not be used.
Well, that's it. Now we have our OPCUA ready.
Emulating CODESYS PLC

Go to start, and find CODESYS CONTROL WIN V3- x64 Systray then run it.
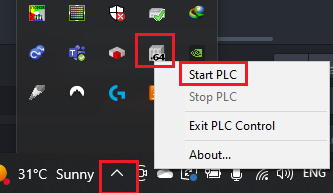
Go to your windows lower bar and click Start PLC.

Make sure that the PLC device version is exactly as the picture. If not, right click on device, then click Update, and choose this one.

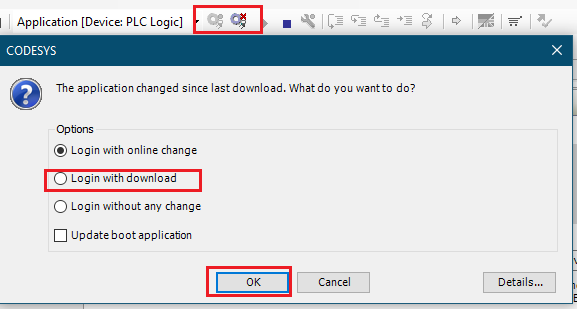
Finally, double click on device, and choose the emulator from the list, And login to the PLC.
That's it. You PLC Is actually ready to go!
Creating CODESYS HMI
How about we crate a small panel that contains a button and an indicator lamp, to contorl the following:
- Proximity, since we will trigger the proximity manually.
- Exit script button
- Ejection
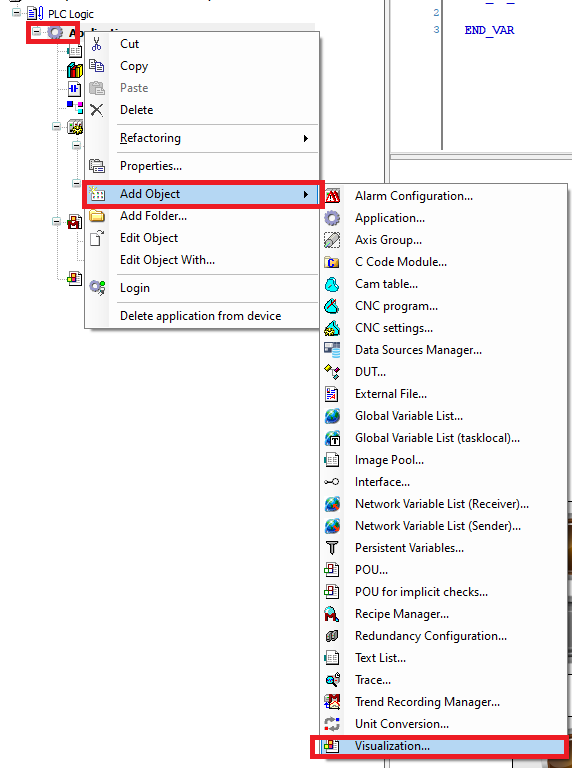
CODESYS Visualization manager
It is very easy to create an HMI on the fly with CODESYS.
Just right click on device and add Visualization Manager.
What will we create?
We will create the following
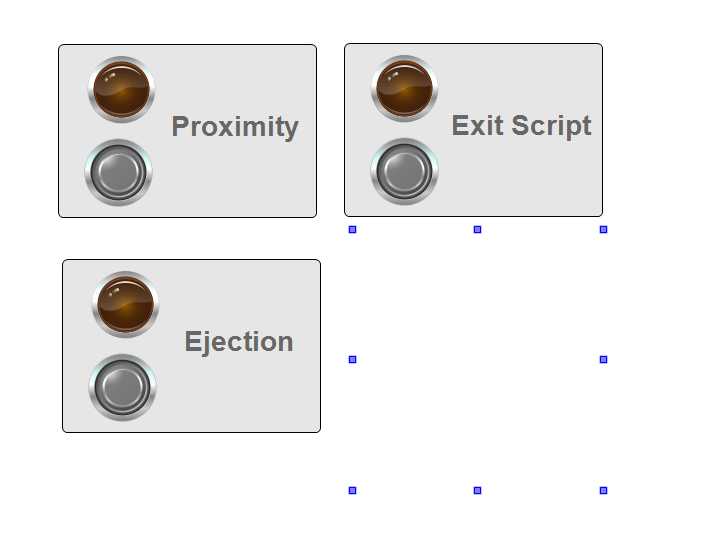
CODESYS Visualization Elements
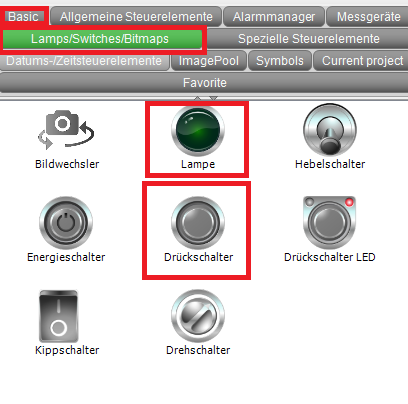
Click on Basic tab, to add a rectangle.
Then go to symbols and grab a couple of buttons and indicator lamps.
CODESYS Linking Symbol to variable
Every symbol in CODESYS has a Variable field, where you can link your program variables to.
Simply double click on Variable field, and choose a variable from the navigator.
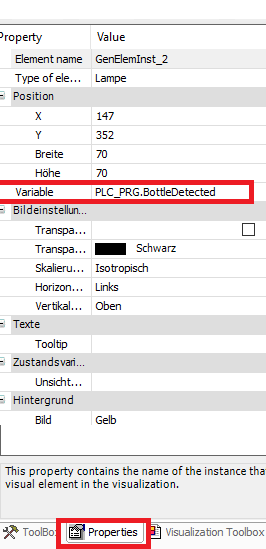
The linking will be as follows:
- Porximity Button ---PLC_PRG.Proximity
- Proximity Indicator --- PLC_PRG.BottleDetected
- Exit Button And Inidicator --- PLC_PRG.exitScript
- Ejection Button --- PLC_PRG.EjectBottle
- Ejection Indicator --- PLC_PRG.EjectRelay
UA Expert Client - Testing OPC UA Server
How would we check if the OPC UA Server we created in Codesys is actually working?
Open UA Expert. If you haven't installed it, please do right now.

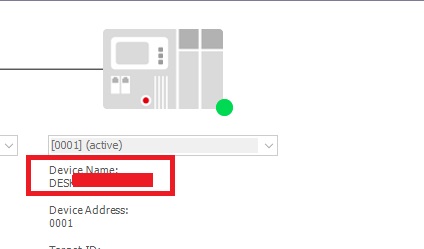
You should be able to see the same server name you saw in opc ua codesys setup. If not just refresh.

UA Expert Read Variable from CODESYS Server
Make sure you followed all the OPC UA setup we have done before. And you systray is On, and your Emulated PLC is online.
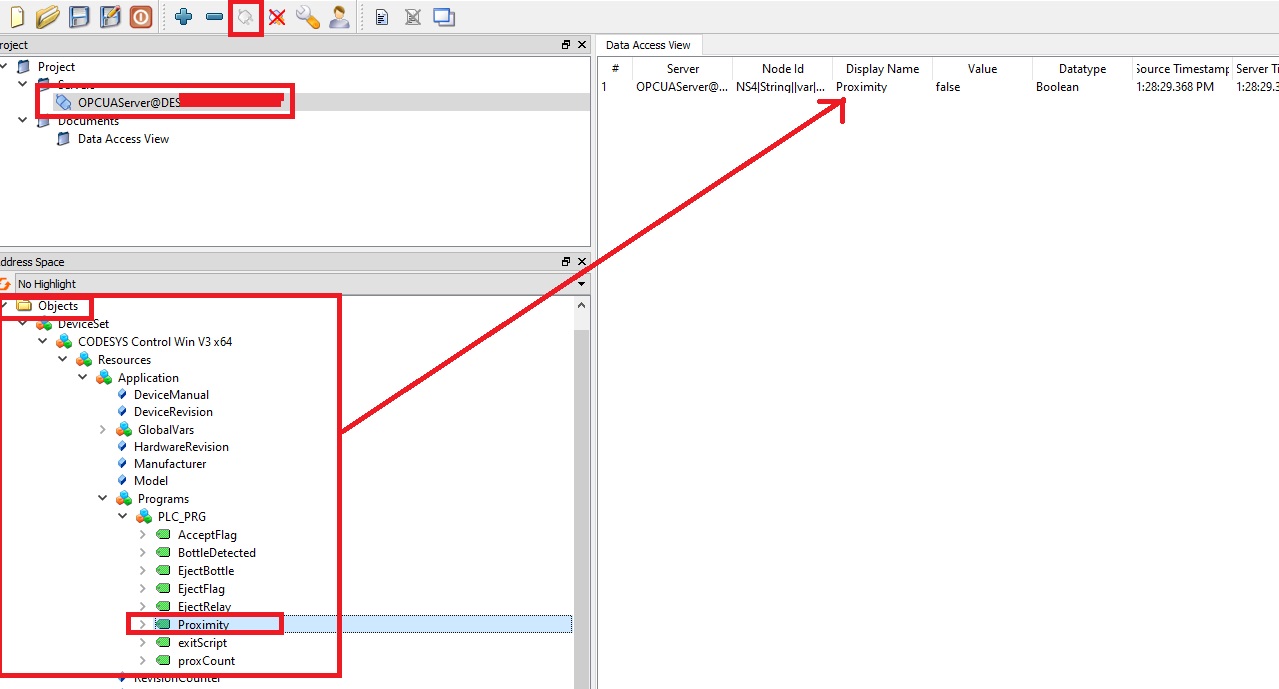
Connect using the UA Expert connect button, and in the tree navigator, search for objects and find the variable like in the image.
One you found it, you can drag and drop it. Now if you change the value in CODESYS, you would see that the value changes in UA Expert and vica versa (as long as you have added that vaiable in the codesys opc ua list).
Goind back to Python
CODESYS OPC UA Python Reading Variable
We have already implemened the function connectOPC() to start a connection.
Before we start, go to Codesys and just type the name of your OPC UA Server and put it in the client connection below.
Let us now do some testing and write a function to read a PLC Variable through OPC UA .
  from opcua import Client

  proximityVar="BottleDetected"
  object=None
  plcVarPath=["0:Objects",
              "2:DeviceSet",
              "4:CODESYS Control Win V3 x64",
              "3:Resources" ,
               "4:Application"  ,
               "3:Programs",
               "4:PLC_PRG",
               "var"]

  #Establish OPC UA client connection, to Emulated PLC OPC UA server
  def connectOPC():
      global objects

      #PLC OPC UA Server Name replace the XXX-XXXX
      client = Client("opc.tcp://XXX-XXXX:4840")
      client.connect()
      print("Connected")
      objects = client.get_root_node()

  #Reading Proximity Variable through OPC UA
  def checkSensor():

    plcVarPath[len(plcVarPath)-1]=str("4:")+ str(proximityVar)

    var_path=  objects.get_child(plcVarPath)

    var_type=var_path.get_data_type_as_variant_type()
    x=var_path.get_value()

    return x

  #testing the Functions
  connectOPC(
  print(checkSensor())
This might seem overwhelming but let me break down to you.
- checkSensor() function is the function we use to read the proximity variable.
- At the top, we have plcVarPath which is the OPC UA Path of our variable where every sub-direcroy is stored as a list element.
- This path can be obtained from UA Expert. For now, always use this path for your main PLC_PRG function variables.
- At the top we have a variable called proximityVar This has a value of a string containing the name of the variable. This should match the PLC Variable name for proximity.
Now let's break down checkSensor()
  def checkSensor():

    plcVarPath[len(plcVarPath)-1]=str("4:")+ str(proximityVar)

    var_path=  objects.get_child(plcVarPath)

    var_type=var_path.get_data_type_as_variant_type()
    x=var_path.get_value()

    return x
- first we are appending the variable name to the path. I have created this small code line to do that.
- Next, we are getting the OPC UA node that contains that variable. This is the main step in reading a variable.
- Then we are reading the type of the variable we are reading. Int, bool.. etc
- Finally we use that node stored in var_path, to read the value using the method get_value().
- And we just return the value we read.
Test the whole code from above, making sure that systray is activated and the PLC is online.
CODESYS OPC UA Python Writting Variable
We have written a function to read from OPC UA.
Let's write a function now that writes a value, which we will use to actuate our ejector.
  ejectVar="EjectBottle"

  def activateEject():
    #Write
    plcVarPath[len(plcVarPath)-1]=str("4:")+ str(ejectVar)
    print("plcVarPath is", plcVarPath)
    var_path=  objects.get_child(plcVarPath)
    print("var_path is", var_path)
    var_type=var_path.get_data_type_as_variant_type()

    var_path.set_value(True, var_type)
This is a very similar code to read, excpet that, we use set_value, and pass it the parameters var_type and the value we want to write.
Test it out!
exitScript()
Since the code will run in an infinte loop, it is a good idea to be able to diconnect the Machine Vision engine from PLC.
It is simply reading a PLC Variable waiting to exit.
  def exitScript():
      plcVarPath[len(plcVarPath)-1]=str("4:")+ str(exitVar)

      var_path=  objects.get_child(plcVarPath)

      var_type=var_path.get_data_type_as_variant_type()
      x=var_path.get_value()
      return x
grabFrame()
This function is going to read our image and store it in a variable we call it original
This function in particular can be change as the system needs. If you have a camera, you could connect your image reading function here and pass it to the algorithm, in my case I am only reading a picture from a folder.
  def grabFrame():

      global original
      original = cv2.imread(frameNumber)
Session Handling
This topic is very important and is necessary to synch between your python code and your PLC code.
- If your proximity sensor is activated and has a value true.
- You python script will go and read that proximitmy variable, meaning we have a Bottle to be proccessed
- The proximity True latching time needs to be long enough that your python script notices it.
- But also short enough so that your python script won't consider that the proximity latching is another bottle coming.
- So you need to indicate that when you are reading the proximity sensor, even if the python script is too fast and tries to read the proximity sensor one more time even after finishing, even though this is still the same bottle, you would need to tell your python code that this is the same bottle so don't evaluate the bottle again.
- The way to do that, is by having a counter in your PLC that increases at every sensor read.
- And your python script will read that counter everytime it needs to check the proximity sensor.
- If the counter value did not change, then the bottle won't be evaluated, because it is already been evaluated by the script.
- If you take a look at the ladder code, you will see that counter.
Putting Everythin Together
So this is the final code!
    # -*- coding: utf-8 -*-
    """
    Created on Wed Sep 14 12:01:19 2022

    @author: Hamsho
    """
  from opcua import Client
  import cv2

  plcVarPath=["0:Objects",
              "2:DeviceSet",
              "4:CODESYS Control Win V3 x64",
              "3:Resources" ,
              "4:Application"  ,
              "3:Programs",
              "4:PLC_PRG",
              "var"]

  ejectVar="EjectBottle"
  proximityVar="BottleDetected"
  exitVar="exitScript"
  proxCountVar="proxCount"
  lastSession=None
  objects=None
  original=None
  frameNumber='bottle.jpg'

  def connectOPC():
      global objects

      client = Client("opc.tcp://XXX-XXXXX:4840")
      client.connect()
      print("Connected")
      #root = client.get_root_node()
      objects = client.get_root_node()

  def checkSensor():
      plcVarPath[len(plcVarPath)-1]=str("4:")+ str(proximityVar)

      var_path=  objects.get_child(plcVarPath)

      var_type=var_path.get_data_type_as_variant_type()
      x=var_path.get_value()

      return x

  def getSessionNumber():
          plcVarPath[len(plcVarPath)-1]=str("4:")+ str(proxCountVar)

          var_path=  objects.get_child(plcVarPath)

          var_type=var_path.get_data_type_as_variant_type()
          x=var_path.get_value()

          return x


  def exitScript():
      plcVarPath[len(plcVarPath)-1]=str("4:")+ str(exitVar)

      var_path=  objects.get_child(plcVarPath)

      var_type=var_path.get_data_type_as_variant_type()
      x=var_path.get_value()
      return x

  def activateEject():
      #Write
      plcVarPath[len(plcVarPath)-1]=str("4:")+ str(ejectVar)
      print("plcVarPath is", plcVarPath)
      var_path=  objects.get_child(plcVarPath)
      print("var_path is", var_path)
      var_type=var_path.get_data_type_as_variant_type()

      var_path.set_value(True, var_type)


  def grabFrame():
      global original
      original = cv2.imread(frameNumber)

  def checkLabel(contours):

      for cnt in contours:
          ep= 0.1*cv2.arcLength(cnt, True)
          ap= cv2.approxPolyDP(cnt, ep, True)
          area=cv2.contourArea(cnt)
          if (len(ap)==4 and area>50 and area<16000):
              cv2.drawContours(image=original, contours=cnt,contourIdx=-1,  color=(0,255,0), thickness=2,  lineType=cv2.LINE_AA)
              print("No Issue Label Detected")
              return 1


  def classifyCameraImage():
      c=[]

      image = cv2.imread(frameNumber, cv2.IMREAD_GRAYSCALE)
      #cv2.imwrite('contourgrey.jpg', image)
      image = cv2.adaptiveThreshold(image,255,cv2.ADAPTIVE_THRESH_MEAN_C,cv2.THRESH_BINARY,15,5)
      #cv2.imwrite('contourgreybk.jpg', image)

      contours, heir= cv2.findContours(image=image, mode=cv2.RETR_CCOMP , method=cv2.CHAIN_APPROX_NONE)
      if (checkLabel(contours)!=1):
          print("No label found Activate PLC Reject")
          return 1


  if __name__ == '__main__':
      connectOPC()
      while(1):

          if exitScript():
              break

          else:
               if checkSensor() and lastSession!=getSessionNumber() :
                   if getSessionNumber()==5:
                       lastSession=0
                   else:
                       lastSession=getSessionNumber()
                   print(lastSession, getSessionNumber())
                   print("Proximity Sensor Activated")
                   grabFrame()
                   if classifyCameraImage():
                       print("Bottle Test Failed")
                       print("Ejecting.......")
                       activateEject()

                   else:
                      print("Bottle Test Passed")